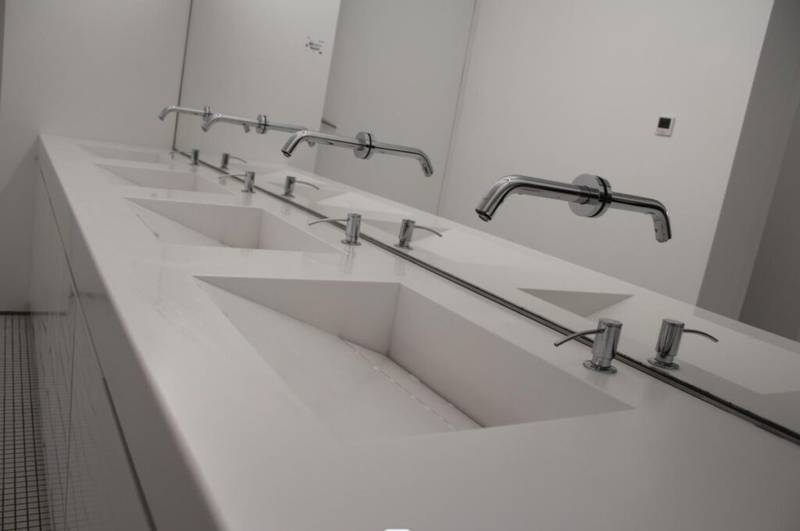
A long wash trough may look straightforward in a rendering, yet several details determine whether it works well once installed: where the water lands, how it drains, how the basin is supported and whether a technician can reach the waste fittings. Clarifying these interfaces before fabrication helps avoid costly changes on site.
This guide is for designers, contractors and buyers planning shared wash areas in commercial, education or hospitality spaces. The photographs are examples of wash-area arrangements; each project needs its own design and installation review.
1. Plan the people and the space first
Start with the number of simultaneous users, the available wall length and the activities at each position. Mark tap centre lines, soap dispensers, mirrors, hand dryers and circulation routes on one coordinated drawing. A longer basin does not automatically create comfortable wash positions: users need adequate room to stand and use the fixtures without interfering with one another.
Where accessible use is required, check the applicable local rules and project brief before fixing counter height, knee clearance, controls and approach space. Requirements vary by location and user group; a standard-looking trough is not automatically compliant.
2. Coordinate tap reach with basin geometry
Show the actual tap model, spout height, projection, outlet angle, flow rate and mounting position on the section drawing. Check where water lands when hands are under the stream. A shallow trough, a high spout or a stream directed toward a near-vertical wall can increase splashing depending on the configuration.
Sensor taps also need enough space for their sensors, power or battery access and any control box. Ask the tap supplier and fabricator to check the complete arrangement together. For a repeated or high-visibility installation, test a representative physical mock-up with the specified tap and operating pressure.
3. Agree the drainage arrangement
Identify the number and position of outlets, the waste fitting dimensions, connection direction and the available space for traps and pipework. Troughs can use individual outlets or a channel, depending on the approved design. Their drainage performance depends on the basin geometry, flow and outlet arrangement; neither a long trough nor multiple outlets alone guarantees adequate drainage.
Discuss the basin floor and fall toward each outlet with the fabricator and the plumbing designer. Avoid promising that no water droplets will remain: water testing should use acceptance criteria agreed for the project. Decide whether an overflow or other flood-protection measure is required in the local jurisdiction and for the chosen tap and waste configuration. Do not assume an overflow is optional everywhere.
4. Design support for the complete load
Confirm whether the trough is wall-hung, cabinet-supported or installed on a frame. The support must account for the unit, fittings, foreseeable water and use loads, as well as the substrate and fixings. A decorative front panel or adhesive is not, by itself, proof of adequate structural support.
Ask the responsible designer or installer to specify the frame, anchorage and wall preparation. Show bracket locations and clearances on the shop drawing, and confirm that support does not obstruct waste fittings or access panels. Follow the selected material and installation guidance for the actual unit.
5. Plan joints, cleaning and maintenance
Long runs may need to be made or delivered in sections because of sheet size, transport routes or site access. Agree where any joints will be made and whether they will be completed in the workshop or on site. Joint placement, reinforcement and finishing must follow the chosen material manufacturer’s instructions and the approved design.
Provide accessible space for removing waste covers and servicing taps, traps, sensors and valves. Internal corners, drain covers and the transition to the wall should be practical to clean. Solid surface can support a low-maintenance design, but it is not self-cleaning or sterile: routine cleaning and inspection remain necessary.
6. Compare quotations using the same scope
A lower quotation may exclude items that another supplier includes. Ask each supplier to state:
- Overall dimensions, number of wash positions, material grade, colour and finish.
- Basin geometry, outlets, waste fittings and overflow or flood-protection arrangement.
- Tap holes and whether taps, sensors, plumbing and electrical equipment are included.
- Support frame, fixings, access panels and responsibility for structural design.
- Section sizes, joint locations, site work, packing, delivery and installation scope.
- Approved drawings, sample or mock-up, inspection and water-test criteria.
A practical pre-order checklist
- Share a dimensioned plan and section with actual tap and waste specifications.
- Confirm local accessibility, plumbing and electrical requirements with the responsible professionals.
- Approve the basin shape, water landing points, drainage and any overflow strategy.
- Coordinate support, wall construction and access for future maintenance.
- Check the delivery route, proposed joints and the division of workshop and site work.
- For critical projects, agree on a physical mock-up and documented test before batch production.
For a custom project, KSTONE can review your drawing, quantities, intended fixtures and delivery requirements before preparing a fabrication quotation. The final support, services and code compliance should be confirmed by the qualified parties responsible for the installation.
Further reading: HIMACS basin installation guidance and an example wash trough installation guide. These documents apply to their respective products; use the instructions for the actual specified unit.